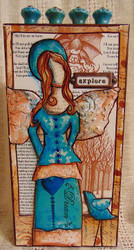
Paper Collage Angel
Posted by DecoArt on Oct 26th 2016
Note: I chose paint colors that are not traditional Christmas, but you can go more with a Christmas-themed angel by changing the paint--this is what I used for this project.
Items Needed:
- DecoArt Media Mediums and Specialty Products - Modeling Paste - White (DMM21-71)
- Andy Skinner Stencils 6x6 - Whirlpool (ANDY54-K)
- Andy Skinner Stencils 8x8 - Alphabet Spaghetti (ANDY101-K)
- Andy Skinner Stencils 12x3 - Burning Rubber (ANDY01-K)
- Personally Yours - Urban Ink 6x9 - Beliefs (PYU25-K)
- Mark Making Tools I.e.%3A Bottle Caps%2C Foam Stamps%2C Texture Tools%2C Etc.
- Brayer
- Palette Knife
- Book Pages
- Assorted Brushes
- 100lb Cardstock
- 6%22 By 12%22 Deep Edge Cradle Board
- Brown Permanent Pen With Brush Tip
- Stamps
Instructions:
Start by painting papers using stencils, mark making tools and whatever comes to mind--just play and experiment. I like to use the 110lb cardstock paper (which can be found at any office supply store). It's very durable, holding up well to lots of layers.

I knew that I wanted my angel's wings to have texture, so I applied the DecoArt modeling paste with a palette knife over the Gears and Cogs stencil on cardstock paper, which held up great. When dry, I added watery layers of Titan Buff, Yellow Oxide and Burnt Sienna to it, adding and taking away until I was happy with the result. Note: be sure to clean your stencil that you used to apply the modeling paste to right after use.

Gather your painted papers and decide which ones that you would like to use for your angel and background. I chose also to use some book pages for added texture to the piece. Start by adhering your papers to the cradle board for your background--this is where I decided to use the book pages. Apply the papers with the DecoArt matte medium with a brayer, making sure to get all of the air bubbles out. It's helpful when adhering your painted papers to wet the back of them with water to make them more pliable before applying the matte medium. Also to assure good adhesion and less wrinkles, apply the matte medium to the surface also. Apply the matte medium over the front of the papers also once they're adhered to the surface to seal everything in. Also, if desired, apply the papers to the sides of the board or you could just paint them. Set aside to dry.


Make a basic template of your angel placing it on the cradle board to see if it's the proper size for the surface.


Apply your angel on to the background with the matte medium in the same manner that you adhered the background.

Once dry, you can add the finishing details. I painted in her hair with Burnt Sienna and Titan buff, and the same colors for her face--mostly Titan Buff with a little Burnt Sienna for shading. If desired, add a word sentiment stamp--you can add more details to her dress. I also added a little bit of watered down Primary Cyan to her wings. This part is intuitive--whatever speaks to you.

I also added a border along the whole edge with the same paper that I used for the ground, and added a bird made from my painted paper, and also more embellishing on the dress.


I hope I've inspired you to make your own angel. Once you start creating, it's fun to let go and see where your angel will take you.


