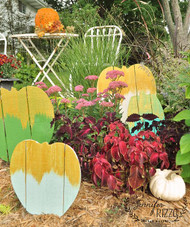
Gold Frosted Wood Pallet Pumpkin Patch
Posted by DecoArt on Sep 27th 2016
I am excited to share with you a quick and easy way to add some bright and fun Fall décor to your garden space! Painting wood pallet pumpkins from Walnut Hollow with DecoArt’s Outdoor Living paint is a great way to brighten up garden areas.
It brings in color just as the blooms are starting to die down, and adds a fun, whimsical touch to conventional fall décor. It’s a great way to transition into Halloween and Thanksgiving without having to bring out the typical orange and black décor. Painted in fun colors, gold paint gives the pumpkins a modern take on a “frosted look”.
Items Needed:
- Americana Decor Outdoor Living 8oz - Picket Fence (ADOL02-36)
- Americana Decor Outdoor Living 8oz - Sunset (ADOL08-36)
- Americana Decor Outdoor Living 8oz - Lily Pad (ADOL12-36)
- Americana Decor Outdoor Living 8oz - Frosted Glass (ADOL13-36)
- Americana Decor Outdoor Living 8oz - Poolside (ADOL14-36)
- Americana Decor Outdoor Living Metallics 8oz - Gold (ADOL27-36)
- Americana Decor Outdoor Living 8oz - Wildflower (ADOL07-36)
- Walnut Hollow Wood Pallet Pumpkins
- Wood Stakes Or Dowels
- Assorted Brushes
Instructions:
Start by gathering wood pallet pumpkins of various sizes to build your patch. We used three large, two medium and two small, to vary size and shape.

Give your wood pumpkins a light sand if a smoother texture is desired. Otherwise, just start painting in fun colors from the Outdoor Living line of paints.

These will help the pumpkins can hold up to call kinds of Fall weather. Paint the entire pumpkin, including the back.
Once the paint dries, use a brush to use Gold from the Outdoor Living paint line to make brush strokes from the top down stopping about halfway down.

The more uneven the brushstrokes are at the bottom better! Once the paint dries, adhere stakes or dowels to the back of the pumpkin using hot glue,screws or a staple gun to easily be able to stand them in the ground.

The pumpkins go into the ground more easily if the holes are pre-made in the ground.

Stagger the pumpkins working largest to smallest to make the “patch”, grab a spiced latte and enjoy!

