Recycle Your Paint Waste
Posted by DecoArt on Feb 11th 2016
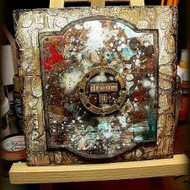
When using spray paints or sprinkling diluted acrylic paints with a brush on my projects I always use shoe box lids to cover my desk and the surroundings. With time colours and patterns layer and mix on these lids and form beautiful abstract works of art! You just have to be able to see them! I used one of them for this quick and easy mixed media panel – trying to make it the star of my creation.
I have included the media used on the shoe box lid with the products list (as far as I was still able to spot and name them properly) – even though they weren't used to intentionally create the effect of course. Just in case someone wants to recreate the effect or colour scheme. But it is more fun to use the stained and splattered pieces of card you already have in your stash! It will make you look differently at them and open up new ways of using what looks like waste at first glance!
Items Needed:
- DecoArt Media Mediums and Specialty Products - Gesso - White (DMM18-71)
- DecoArt Media Mediums and Specialty Products - Crackle Paste - White (DMM17-71)
- DecoArt Media Misters - Shimmer Turquoise (DMM09-30)
- Andy Skinner Stencils 8x8 - Alphabet Spaghetti (ANDY101-K)
- Paint Covered Card
- Spellbinders Circle Dies
- Spellbinders Nestabilities Enhancing Elements
- Sizzix %22Cabinet Card%22 Die
- Die Cutting Machine
- Soft Brush
- Foam Board
- Black Cardboard
- Cutting Mat
- Carpet Knife
- Metal Ruler
- Palette Knife
- Black Sticky Foam Pads
- Word Stickers
- Baby Wipes
- Text Rub Ons
Instructions:
Choose a specific area on your splattered piece of card (or shoe box lid) that you find the most intriguing and cut out with cabinet card die.
Cut some foam board into a square panel that fits your die cut center piece and leaves a bit of a frame around it.
Prime your foam board with white Gesso. Once that is dry use a stencil and apply an even layer of white Crackle Paste through it with a palette knife. Let dry naturally!
While the foam board is set aside to dry, die cut and emboss your circle for the focal element from black cardboard.
Apply some Orange Flicker Metallic Lustre to the circle using your fingertip. Then buff to a sheen with a soft cloth.
Brush on a generous layer of Raw Umber Antiquing Cream and let dry to the touch.
Then wipe back the excess with a baby wipe. Leave more Antiquing Cream towards the outer edges to create a kind of shading that will draw the focus towards the center of your panel.
Use a heavier body dark brown acrylic (like DecoArt's Americana paints) to paint the white edge of the foam board. Also smudge some of it around the edges of the front panel to create a frame.
Cut some black sticky foam pads to size and mount them to the back of the circle. Don't glue it in place yet as we have to add our word stickers and blend them in first.
Add some Orange Flicker Metallic Lustre highlights in according places to blend the panels together. Place the splattered panel onto the foam board panel to find the appropriate spots.
Tone down the outer frame of the cabinet card panel with a brown marker. Add word stickers and text rub ons. Blend in the word stickers by drawing a thin darker outline with a marker. Next glue on the die cut circle. Then adhere the finished panel to the foamboard using sticky foam pads. For more dimension try stacking your sticky foam pads!
You're done! And suddenly waste has been turned into treasure, hasn't it!
I never throw away splattered paper or card and often I cut up my shoe box lids while they are still good – but if kept using them and applied more random layers of spray paints and splatters of other media and brown inks, colours would start to mud and the beauty of colourful randomness would get lost. So spotting the right moment is important with these projects and already part of the creative process!
Thanks Everyone!

