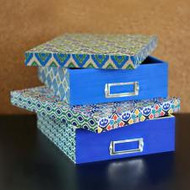
Decou-Paged Boho Storage Boxes
Posted by DecoArt on Feb 3rd 2016
This is the perfect project for getting your office organized and giving all those messy papers or photos a pretty box to be stored in. You can label your boxes as needed when your project is done or leave them unlabeled.
Items Needed:
- Americana Decor Chalky Finish Paint 2oz - Legacy (ADC21-30)
- Americana Decou-Page Papers - Safari Life (DP01-K)
- Americana Decou-Page Papers - Ikat (DP04-K)
- Americana Decou-Page Papers - Moroccan (DP05-K)
- Americana Decou-Page Papers - Tribal (DP07-K)
- Scissors
- Foam Brush
- Wooden Storage Boxes
- Assorted Brushes
- Paper Towels
- Q-Tips
- Pencil
Instructions:
Notes:
- Take care not to touch papers until they are dried once glue is applied.
- When smoothing out wet Decou-Page papers be gentle and move slowly, when getting rid of air bubbles as not to tear the wet paper.
- Do not over glue.
- Do not paint until outside of Decou-Page papers have been glued for a finish, and that finish is completely dry.
Gather all your supplies. Cover your surface area with something protective. I use a thin sheet of wood. You can use an opened up garbage bag too! Pick out pretty Decou-Page papers of your choice. I just love the boho theme, bright colors and being able to mix and match! Don't you?!
First thing you'll want to do after you pick the color combo you want to put together is size your paper pieces to your project. I find it more accurate to fold over areas I am working on.

Give it a nice sharp edge.

Work a section at a time. Then cut to size. Don't worry about it being perfect. Slightly bigger is always better than too small. You can trim after gluing.

Next add Americana Decou-Page glue to smooth wood surface.

Next add glue to back of the paper.

Work only one section at a time, working slowly as not to tear paper.

I like to add paper slowly. Lining up ends on one side then working my way across. I gently smooth out air bubbles with my hands or fingers. The paper is pretty strong but, when wet it can rip if you aren't gentle.

Trim excess edges. Holding scissors at an angle will help you get close. Be careful when cutting by edge. Next Wipe scissors after each cut.

Repeat glue process for each section until you have covered all the areas you want in paper.
When all your papers are on, brush with a finishing coat of Americana Decou-Page glue and let completely dry before moving on. Working in a warm room or with a fan on will help this process of drying.

Grab some coordinating paint colors for sections you'd like to paint.

I used painters tape to give me a clean line. (Do not use tape on your paper surface. I did this for changing colors of painted surfaces.)
Use an angle detail brush for edging next to dried Americana Decou-Page paper surface. You can easily wipe clean with a paper towel that is slightly damp.

If you want to paint the inside of your box but, paper the bottom you will need to tape off the surrounding area to keep free of paint. This way the paper will be glued to the wood surface and not the paint surface.

When you pull up the paint your surface will look like this. Then you can glue down your paper to complete the inside.

I used several paint and paper combos to really give it that boho feel. I can't wait to share a few more projects with these papers.

Now you can have the office or craft room space you've always wanted by adding pretty Decou-Page papers to your storage or home décor. Think of all the other possibilities for these pretty papers!


