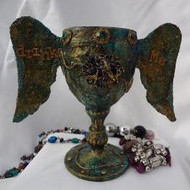
Winged Goblet
Posted by DecoArt on Jul 6th 2015
This is a fun project that will turn any glass into a magical goblet! You could also use this technique to create a fun, personalized trophy.
Items Needed:
- DecoArt Media Mediums and Specialty Products - Modeling Paste - White (DMM21-71)
- DecoArt Media Mediums and Specialty Products - Crackle Paste - White (DMM17-71)
- Pair Of Wings
- Glass Goblet
- Small Letters
- Aluminium Foil
- String
- Micro Beads
- Flat Backed Gems
- Charms
- Assorted Paint Brushes
- Thin Book Pages
- Thin Cardstock
- Scissors
- Baby Wipes
Instructions:
Clean and dry the goblet thoroughly to ensure good adhesion. Brush Decou-Page glue over the outside of the glass and cover with the paper...it's best to work in small areas so that the glue doesn't dry out. Smooth the paper down as you go.
Cover two wings with paper in the same way. You may wish to apply more Decou-Page over the goblet and the wings to ensure everything is well stuck.
Cut two rectangles of thin card for each wing. Fold each in half widthways and glue these to either side of the wing base. Snip the loose portions of the card to create tabs.
Apply glue to the card flaps and attach either side of the goblet. Tear small pieces of paper and adhere these over the flaps of card to strengthen the bond. Add extra strips above and below the wings for extra support. Allow to dry.
Using a stiff brush, apply white Modeling Paste over the outside of the goblet and the wings. This will not only create texture but will also strengthen the wing joints. Allow to dry thoroughly.
Apply Crackle Paste to certain areas of the goblet and wings, blending into the surface at the edges. Apply more heavily in some places...thicker paste will create deeper cracks whereas a thinner coat will create an eggshell crackle. Allow to dry - be patient and don't try to speed up the process or the crackles won't appear.
Paint the entire piece with Phthalo Blue and Transparent Red Iron Oxide. Mix the paints together, and add more, or less water as you go, so that you create varying colours on the surface. allow to dry.
Using your finger, sweep the Metallic Gold acrylic over the surface, working in small areas at a time. Immediately wipe the paint off with a baby wipe so that it remains almost solely in the crackles.
Apply flat backed gems around the top of the goblet.
Roll strips of aluminum foil into thin "sausages" and glue these around the gems.
Glue string, or cord, around the goblet in any areas that you wish,to create a raised design.
Use a fine brush to paints the gems, foil and string with the Metallic Gold acrylic.
Add Decou-Page glue to random areas of the wings and pour micro beads onto the wet adhesive. I used blue/green and a silver/gold mixes. Be sure to have a container with sides under the goblet or the beads willgo everywhere! Allow to set.
Using your finger, apply Phthalo Blue paint very lightly over the gold painted gems, foil and string.
Paint both sides of each wing using DecoArt Glamour Dust paint in Gold Glitz. Allow one coat to dry before adding a second - the glitter will be more apparent with each layer and I found two to be just right for the look I wanted here.
Paint the inside of the goblet with DecoArt Chalky Finish for Glass - I used Timeless. This will cover the wording that was showing through the glass. Allow to dry.
For a sumptuous finish to the inside of the goblet, paint over with the Metallic Gold. The Chalky Finish will have given a great surface for the Metallic Gold to adhere to.
Choose words made up of small letters to add to the piece...I picked "Drink Me" as in Alice in Wonderland. Paint the letters gold and then glue into place on the wings.
Paint any extra charms or gems that you wish to decorate the goblet with - I used a dragon charm which I painted gold and highlighted with Phthalo Blue. Glue onto the goblet and support until fully set. I also spattered some of the Metallic Gold acrylic onto the wings using a stiff brush.
Once completely dry, paint the whole piece with Soft Touch varnish to protect it.

