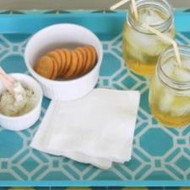
Decoupage Serving Tray
Posted by DecoArt on Aug 8th 2013
Items Needed:
- Fabric
- Sponge Roller
- Amazing Clear Cast Resin
Instructions:
I found a large wood tray at the thrift store that was perfect for this project. It actually was gold and black which was not the colors I had in mind. No need to worry as we are going to paint the tray to match the fabric we are going to decoupage onto the bottom. I used Patio Paint in Desert Turquoise for my tray. I am going to be using this tray outdoors on my porch so I used the Patio Paint for durability. I left the bottom of the tray in the original black color but you can paint it any color your choose. Allow your paint to fully dry and cure before continuing on to the next step.
I then grabbed my Americana Decoupage and got to work with the fabric. The fabric is cut slightly larger than the bottom of my tray. I had that sponge roller in my crafting supplies and it will make the job go a little quicker but is not mandatory. I think a straight edge helps you smooth your fabric. An old credit card will do the job here as well.
Apply the decoupage to the bottom of the tray in an even coat and apply your fabric. Press down with a straight edge or old credit card smoothing the fabric and eliminating any wrinkles. Press all the way to the corners of the tray. Keep any pattern on your material as straight as possible
Now use a craft knife along with your straight edge and trim the excess fabric around the edges. Press with the straight edge or credit card and cut along the line with your craft knife. Continue all the way around the tray.
Allow the decoupage to dry before continuing on with the project. Then apply an even coat of decoupage medium to the top of the fabric. This will seal the fabric for the epoxy. Allow this coat of decoupage to dry overnight
I used Amazing Clear Cast Resin on my project. There are a variety of two part casting resins on the market and any of those will work. You just need to follow the package directions of the brand you choose. Working with resins can be intimidating but it is very simple. Following directions is key. Once mixed to the package directions, just pour into your tray and spread to all of the edges. A flame can be used after pouring to pop bubbles on the surface of your resin. I use a standard lighter that has a long arm and wave it over the surface.
The epoxy will have to cure for at least 24 hours before use. I usually give my projects a few days to cure. I love how the epoxy layer gives the tray a glass like appearance on the top. Plus it is a fraction of the cost of a custom cut piece of glass or plastic for this same tray. Plus since I will be using this on my porch, the protection of the epoxy will keep my tray looking great for a long time
You are ready to serve up your tea and some snacks on your porch. All on your shiny new decoupage serving tray. Sweet tea anyone?

