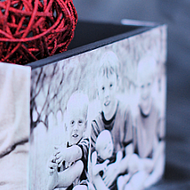
Decoupage Photo Box
Posted by DecoArt on Apr 15th 2014
Items Needed:
- Printed Out Pictures (about 5-7 Of Them)
- Gray Or Black Paint
- Wooden Box
- Paint Brush
- Water Basin
Instructions:
I started out by painting the inside of my box a deep gray. (Paint it any color you want!).

While that was drying, I printed out pictures from my computer to use on the box:

Then, I traced on the pictures where to cut them:

And cut them out. I then used the decoupage to adhere them. I put a thin layer on the box and stuck them on. Gently smooth out and wrinkles and bubbles. I overlapped pictures and had them turn corners all the way around the box. (You may want to plan this out before you start attaching them.)
Once I had all the pictures on, I gave it a very light coat of decoupage on top of the pictures. Be very careful as you do this. The ink from your pictures will run a little and change colors a tiny bit, but that gives it a nice look. Just be careful not to do too much decoupage or you will have a mess. Just a thin layer is all you need.

Let it dry and then put it to good use!
Be sure to visit Crazy Little Projects for more projects and to learn more about Amber Price.


